Intro
各平台依照指示下載安裝即可。Windows環境下指令為py。
Ecosystem - 生態系

語言特性
安裝
官方網站 Download: https://www.python.org/downloads/
以 Package Manager 安裝 Python 3 :
-
Debian / Ubuntu
$ sudo apt install python3 -
CentOS
$ sudo yum install python3
版本檢查
$ python3 --versionpython / py
依照環境及版本,直接於指令列執行Python程式碼檔案:
$ echo "print('Hello World')" > hello-world.py

$ python hello-world.py
$ python3 hello-world.py
$ py hello-world.py
pip
PyPI · The Python Package Index
Pip 為 Python 套件管理器,可以直接官網下載執行 get-pip.py 自動安裝,或者套件安裝如 APT:
$ apt install python-pip
$ apt install python3-pip
Namespace 規則:{Package name} (與Github無關連)
Pip 使用範例:
$ pip install {package-name}

# 列出已安裝套件
$ pip list
$ pip list --user
$ pip list --outdated

# 更新套件
$ pip install --upgrade {package-name}

# 解除安裝
$ pip uninstall package_name
$ pip uninstall package_name -y
The Packaging Flow - To get an overview of the flow used to publish your code
Run Module
pip從10版之後改為 Module 依環境形式啟動,這好處是可以指定從指定的 Python 指令透過-m使用相依的pip模組啟動:
$ python -m pip install {package}指定python3相依的pip:
$ python3 -m pip install {package}Windows 使用 pip
Windows 環境要使用pip指令得 Add PATH (pip.exe位於Python安裝目錄./Script下),可以參考Is Python in your PATH
Windows 若不想額外安裝設定pip,可以直接使用上述 pip module 方式啟動:
python3.4 -m pip install {package}專案移植
將專案依賴的套件利用freeze指令輸出到指定檔案:
pip freeze > requirements.txt在新平台執行此專案前,即可依照檔案安裝:
pip install -r requirments.txtpyproject.toml
除了 requirements.txt,pyproject.toml 也是目前常用的方式,而且是 pip 預設支援的設定檔,其 dependencies 安裝只需要對專案目錄執行 install:
$ pip install .References
Packaging Python Projects - PyPA
正式環境
uWSGI
透過Nginx > uWSGI > Python架構方式搭建:Quickstart for Python/WSGI applications
Setting up Django and your web server with uWSGI and nginx
Concurrency (並發/並行)
Multi-threading
Python 採用全域直譯器鎖(Global Interpreter Lock,縮寫GIL),新產生的 thread 還是只能共用同一個 CPU core,要達到 Parellelism 可以使用 Multi-processing。
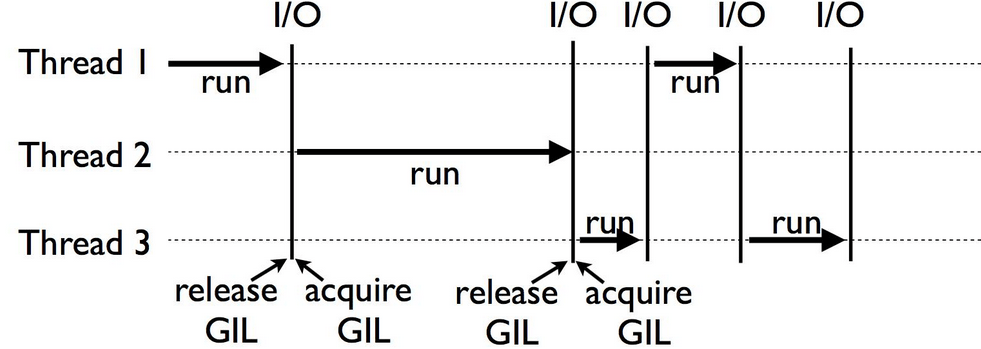
(Reference: datacamp.com)
Python - threading — Thread-based parallelism
Python - queue — A synchronized queue class
Reference: Python 多執行緒 threading 模組平行化程式設計教學
Multiprocessing Vs. Threading In Python: What You Need To Know.
Password-hashing functions 不受 GIL 限制。如: Bcrypt、PBKDF2、Scrypt、Argon2
Multi-processing
multiprocessing — Process-based parallelism
Reference: 進程間的通信(Queue,Pipe)與數據共享(Manager)
編譯 Compile
透過 PyInstaller 套件可以針對當下 OS 環境 build 可執行檔
Command Line
ArgumentParser
Python 內建 argparse lib 可以方便處理 CMD arguments
import argparse

parser = argparse.ArgumentParser(description='Process some integers.')
parser.add_argument('integers', metavar='N', type=int, nargs='+',
                    help='an integer for the accumulator')
parser.add_argument('--sum', dest='accumulate', action='store_const',
                    const=sum, default=max,
                    help='sum the integers (default: find the max)')

args = parser.parse_args()
print(args.accumulate(args.integers))
套件開發 (Packaging Python Projects)
依照上面官網說明操作即可,src/{package-name}下的每個 Python file name 將視為每個 module 支援 import loader。
若要將 file 內某個 class/function 提前 load (例如提高一層namespace) 則可以在__init__.py先定 import。
Package 範例可以參考:TestPackage-yidas · PyPI
版本更新 (Version Update)
可以先清除舊的dist,meta 更新 version 後再 build -> upload:
# Optional
$ rm -rf dist

$ python3 -m build
$ python3 -m twine upload dist/*
套件開發環境
若要透過 import 方式同時開發套件,pip 提供 editable 參數可以安裝指定 local 路徑的套件,以便即時修改測試:
# 在 local package 資料夾路徑下使用 editable 方式安裝
$ pip install -e .

# 透過 list 查看,透過 editable 方式安裝的套件會顯示 local 路徑
$ pip list
Package           Version  Editable project location
------------------ --------- -----------------------------------------------
PackageName   0.0.1    /home/user/developing_package
整合 Git Repository
PyPI 支援 Git 服務整合,以 Github 為例:
- PyPI Project > Publishing: 新增要整合的 git 服務並填入 repo 資料
- 承上 Workflow name 部分,Github Action 提供 Python package template,建立在 repo 後即可將檔名填上,如
python-package.yml(路徑已有規範) - 在 PyPI > Account Settings 建立/取得 API token,並從你的 Github Repo Setting > Actions secrets and variables > Actions 加入 Secrects,Secrect 與 Action file 中的 key name 對應即可 (
PYPI_API_TOKEN)
Publishing package distribution releases using GitHub Actions CI/CD workflows