PGP Flow | Installation |Command |SDK
Intro
PGP (Pretty Good Privacy) - Wikipedia
GPG / GnuPG (GNU Privacy Guard) Wikipedia
PGP - yidas/web-service-principles GitHub
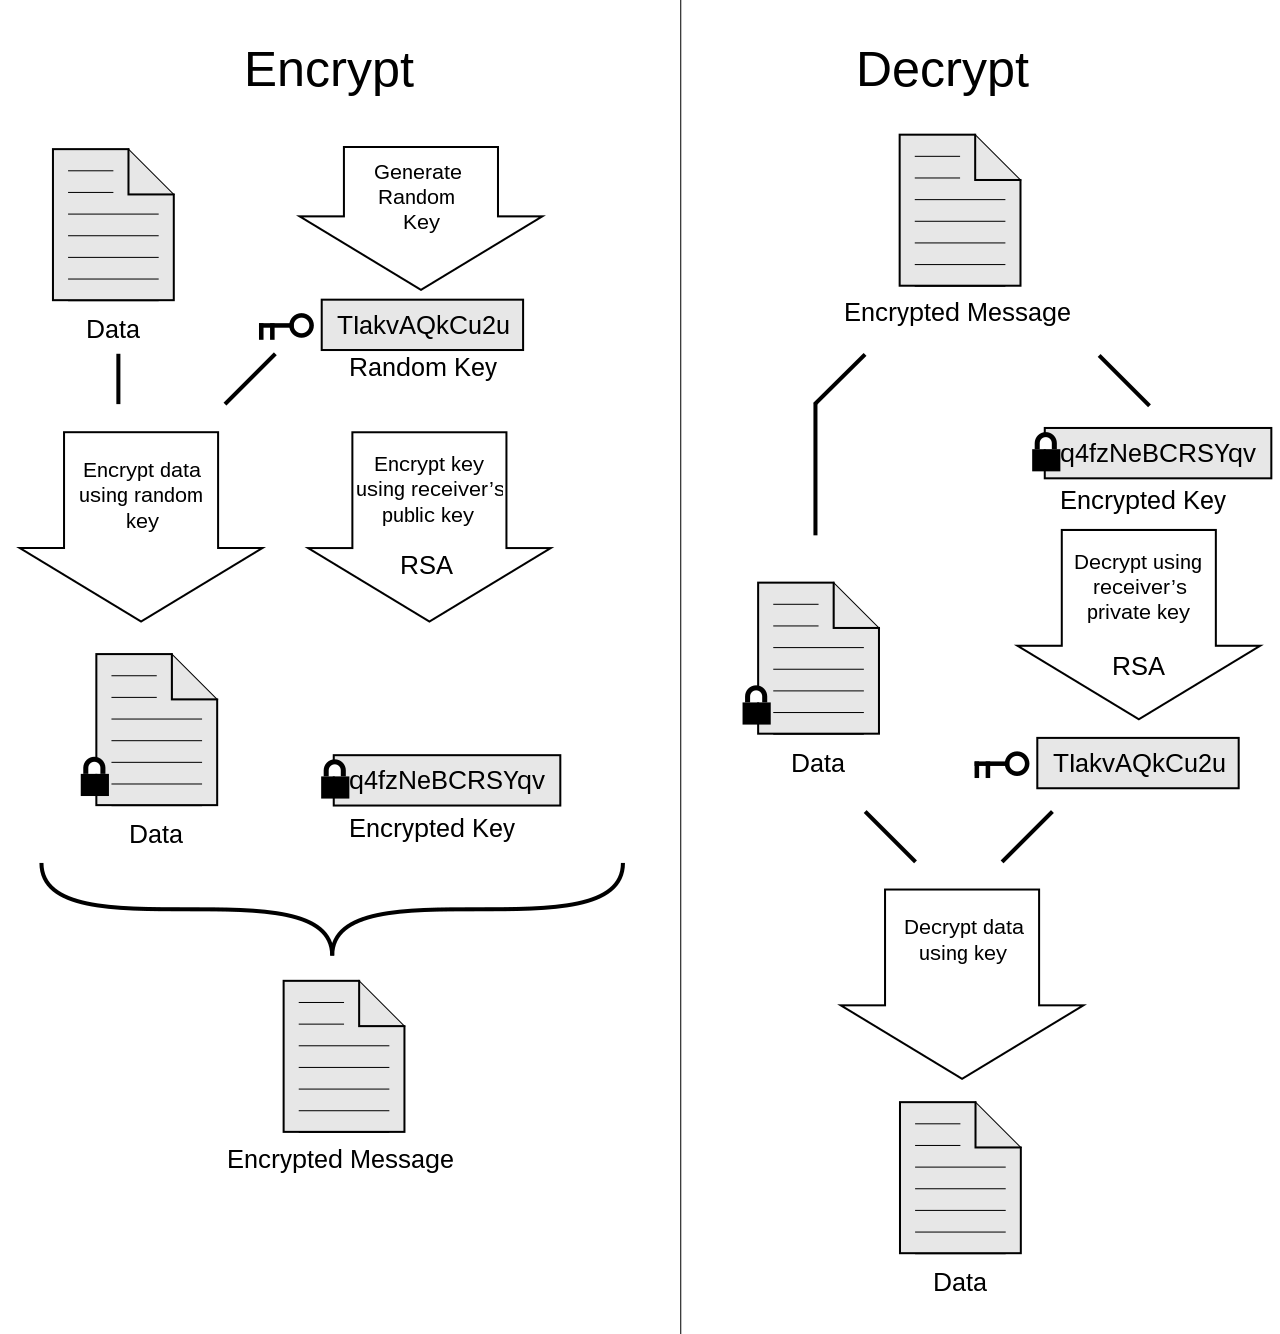
Flow
安裝 Installation
Linux Ubuntu
$ sudo apt-get install gnupgMacOS with brew
$ brew install gnupgCommands
產生金鑰 - Generate public/private key
$ gpg --gen-key

// 完整產生金鑰選項
$ gpg --full-generate-key
完整產生金鑰選項:
gpg --full-generate-key,含algorithm, key length, expired time
其中,Username與passphrase為必要。
列出金鑰 - List keys
list keys (Public keys): -k, --list-keys
$ gpg -k
/Users/user/.gnupg/pubring.kbx
-----------------------------------
pub   rsa4096 2022-03-17 [SC]
FF109AE3F8E4A67130647BD887C3B247FDB83745
uid    [ultimate] Test Key <test-key@email.com>
sub   rsa4096 2022-03-17 [E]

pub   rsa3072 2022-03-17 [SC] [expires: 2023-03-17]
1DBB24F86AF46DC56793606C25BA88AD42AE2F73
uid    [ultimate] Test Expiration <test-expiration@email.com>
sub   rsa3072 2022-03-17 [E] [expires: 2023-03-17]
list secret keys: -K, --list-secret-keys
$ gpg -K
/Users/user/.gnupg/pubring.kbx
-----------------------------------
sec   rsa3072 2022-03-17 [SC] [expires: 2023-03-17]
       1DBB24F86AF46DC56793606C25BA88AD42AE2F73
uid   [ultimate] Test Expiration <test-expiration@email.com>
ssb   rsa3072 2022-03-17 [E] [expires: 2023-03-17]
參數
--with-subkey-fingerprint可以列出 subkey 的 fingerprint,在--list-packets加密文件時可以看到使用的 key fingerprint
加密 - Encryption
$ gpg -ear {Key-Name} < plain.txt > plain.txt.asc其中
-a為輸出ASCII Armor格式,-r為指定Key的USER-ID
解密 - Decryption
$gpg -d < plain.txt.asc > plain.txt密文裡包含Key資訊,不需額外指定Private Key
金鑰操作
匯出金鑰 - Export
// 匯出 Public Key
$ gpg --export -a "{User-ID}" > public-key.asc

// 匯出 Private Key
$ gpg --export-secret-key -a "{User-ID}" > private-key.asc
匯入金鑰 - Import
$ gpg --import key.asc刪除金鑰 - Delete
// 刪除 Public Key
$ gpg --delete-keys "{User-ID}"

// 刪除 Private Key
$ gpg --delete-secret-keys "{User-ID}"
格式轉換 - Armor
將Binary包裝轉成PGP ASCII armor:
$ gpg --enarmor < filename.gpg > filename.asc將PGP ASCII armor解包轉回Binary:
$ gpg --dearmor < filename.asc > filename.gpg簽章與效驗 - Detach-sign & Verify
對目標檔案做簽章,而產生出一個簽章檔案:
// 不指定 key 則使用預設私鑰
$ gpg --detach-sign <file_to_sign>

// 指定 key 進行簽章
$ gpg --detach-sign --local-user <key_id_or_user_id> <file_to_sign>使用verify進行檔案驗章,簽名檔本身已包含 key 資訊:
$ gpg --verify <signature_file> <signed_file>列出訊息 - List-packets
$ gpg --list-packets <PGP_related-file>

// 列出簽章檔案資訊
$ gpg --list-packets plaintext.txt.sig
    # off=0 ctb=88 tag=2 hlen=2 plen=179
    :signature packet: algo 1, keyid 077B412090B46CD8
        version 4, created 1707121586, md5len 0, sigclass 0x00
        digest algo 8, begin of digest 91 23
        hashed subpkt 33 len 21 (issuer fpr v4 0F58AD1F48D53670C92EA64D077B412090B46CD8)
        hashed subpkt 2 len 4 (sig created 2024-02-05)
        subpkt 16 len 8 (issuer key ID 077B412090B46CD8)
        data: [1022 bits]

// 列出加密檔案資訊 (此 Key ID 為 subKey fingerprint)
$ gpg --list-packets plaintext.txt.asc
    gpg: encrypted with cv25519 key, ID 4E8BE3A82F62F431, created 2023-01-01
          "Test Key Name"
    # off=0 ctb=84 tag=1 hlen=2 plen=94
    :pubkey enc packet: version 3, algo 18, keyid 4E8BE3A82F62F431
    ...
        raw data: 10 bytes

// 列出PGP公鑰檔案資訊
$ gpg --list-packets pgp-public-key.asc
    # off=0 ctb=99 tag=6 hlen=3 plen=525
    :public key packet:
        version 4, algo 1, created 1705927965, expires 0
        pkey[0]: [4096 bits]
        pkey[1]: [17 bits]
        keyid: DB158EBBAB884B3A
    # off=528 ctb=b4 tag=13 hlen=2 plen=90
    ...
    # off=1216 ctb=b9 tag=14 hlen=3 plen=525
    :public sub key packet:
        version 4, algo 1, created 1705927965, expires 0
        pkey[0]: [4096 bits]
        pkey[1]: [17 bits]
        keyid: C4CC8DE9886205A0
    # off=1744 ctb=89 tag=2 hlen=3 plen=566
    ...
        subpkt 16 len 8 (issuer key ID DB158EBBAB884B3A)
        data: [4096 bits]